Members (or Patrons)
The members section is where you enlist all your members (or patrons) of your library. Only an unique member no is necessary for a member to check out/in books from your library.
You can provide login access to a member if you wish but it is not a mandatory requirement from system's perspective. However, if you enable login access, system will ask for an unique email address for the member.
Booking Quota
A booking quota is the total limit up to which a member can reqeust / check-out / reserve books (or items) at a given point of time. By default, a global variable for the booking quota is available under Manage -> Preferences section, but the global quota will be overridden with the individual booking quota if set specifically for a member.
You can set individual booking quota for each member using the Add / Edit member method mentioned below. Again, if a individual quota not set, then global quota will be enforced.
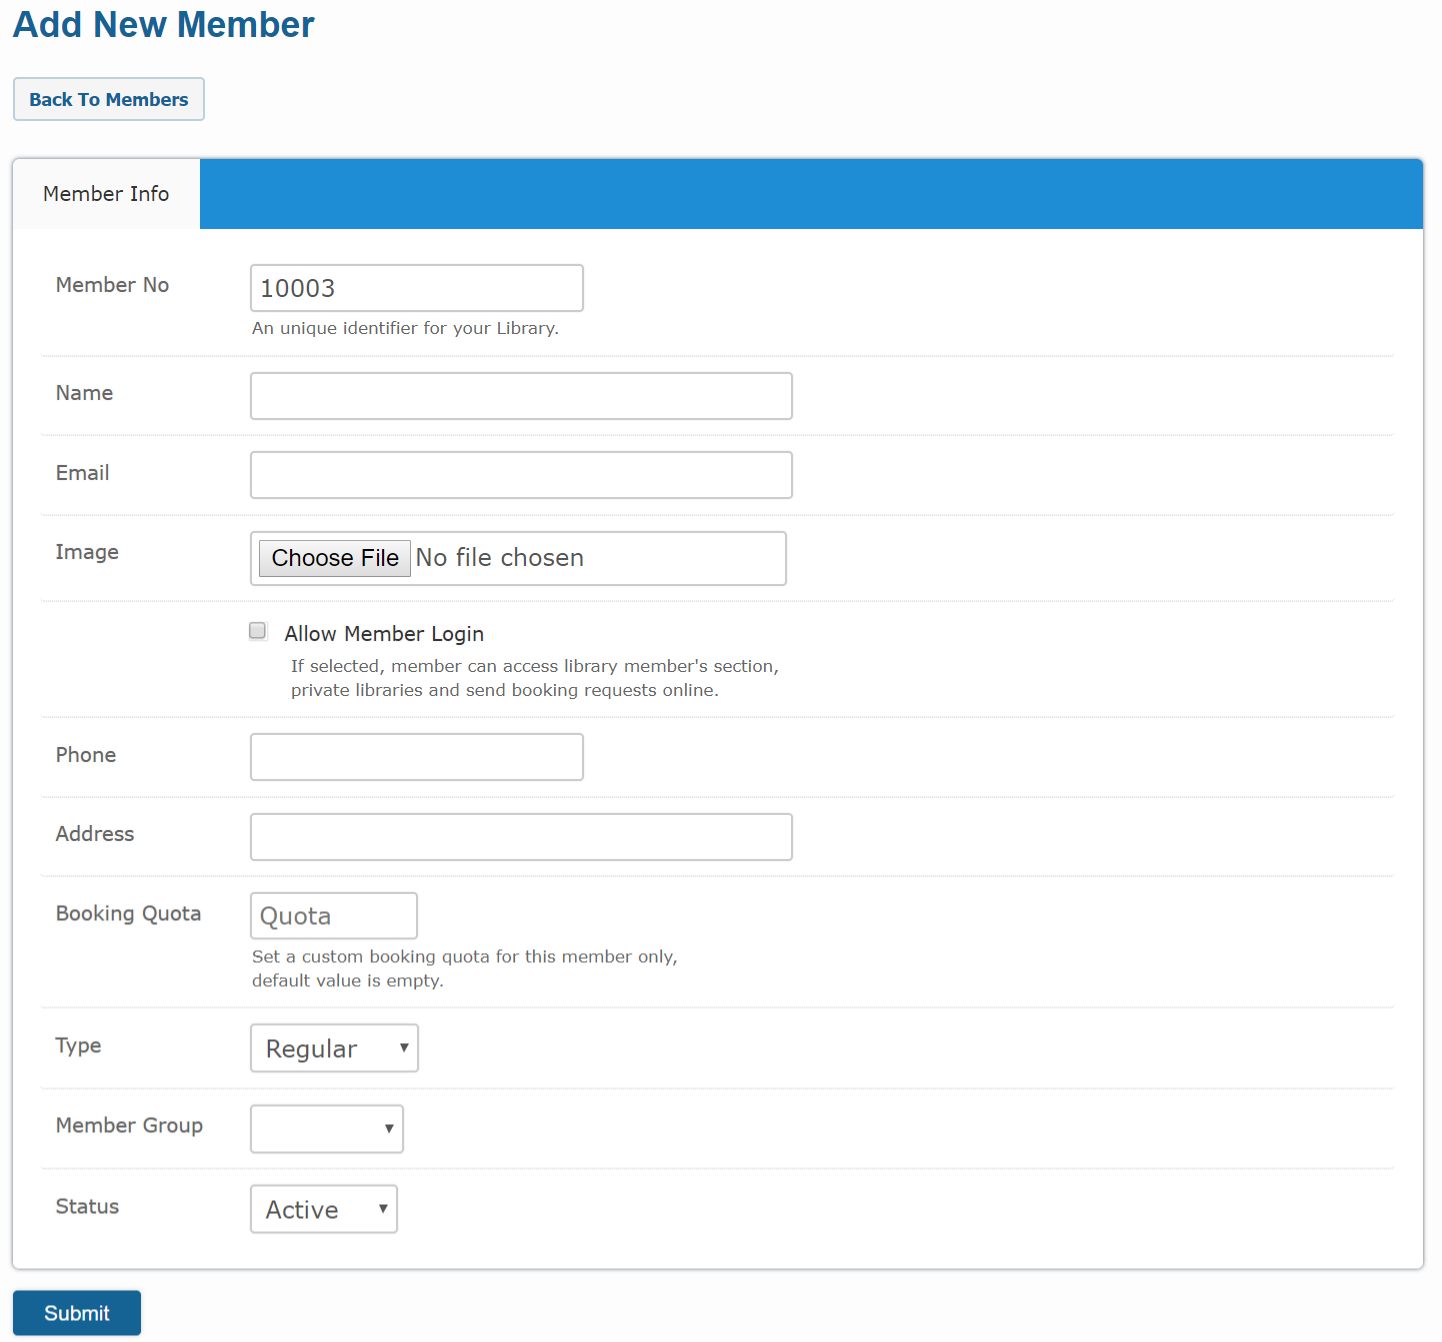
Add new member
To add a member to your library, please follow the below steps:
-
Please go to the
Dashboard -> Circulations -> Memberssection. -
Click on
Add New Memberbutton. -
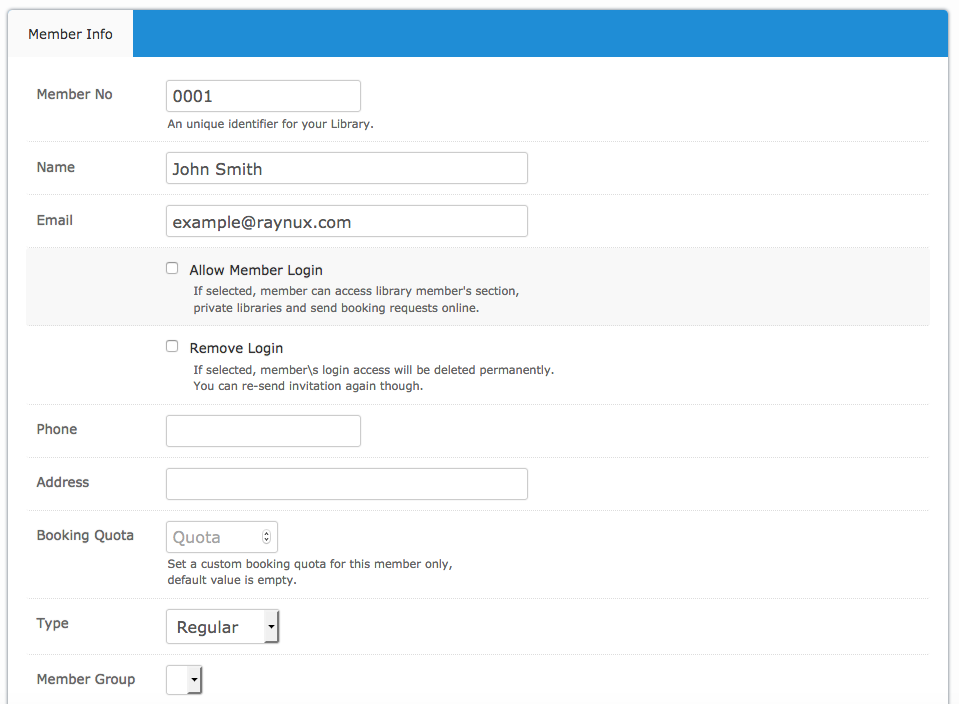
Add new member form will be displayed as shown below.
-
Enter necessary information regarding the member. Only member no, name, type and status fields are mandatory.
- Click on the
Submitbutton when you are done - A new member record will be created.
Edit existing member
To edit an existing member in your library, please follow the below steps:
- Please go to the
Dashboard -> Circulations -> Memberssection. -
Locate the member record you want to edit.
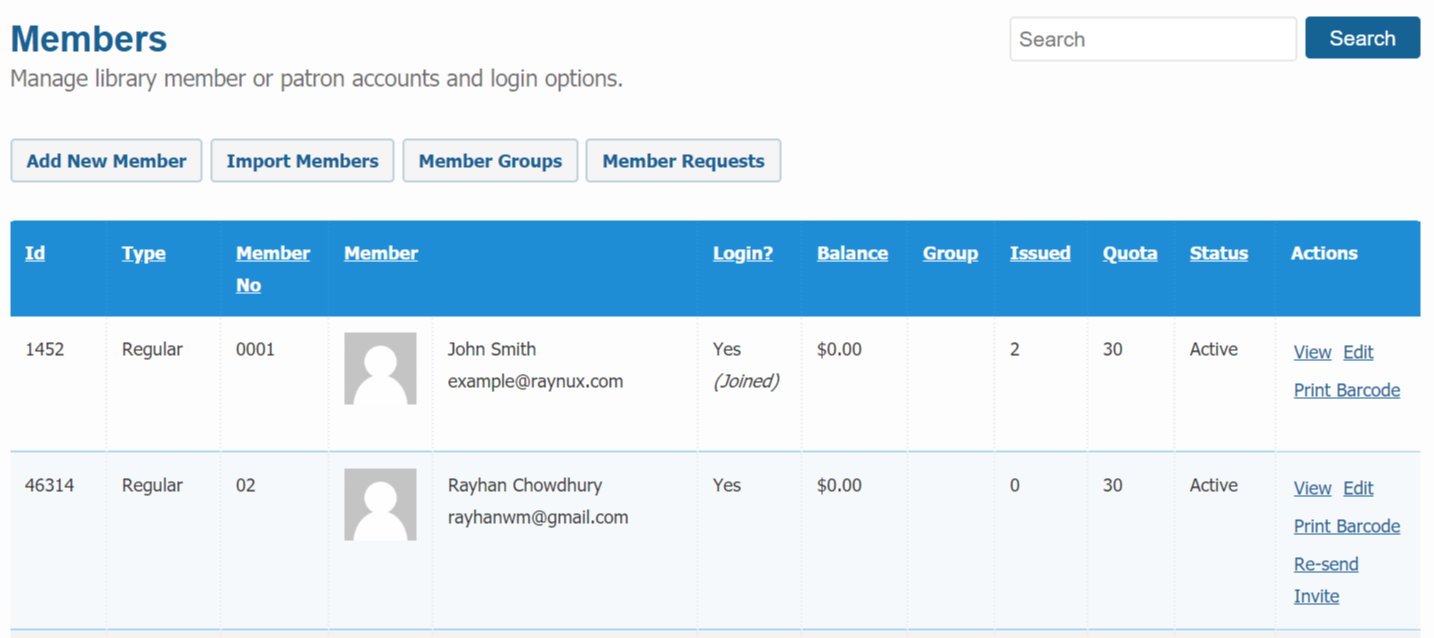
-
Click on the
Editlink on the right to that member. -
Member edit form will be dsiplayed as shown below.
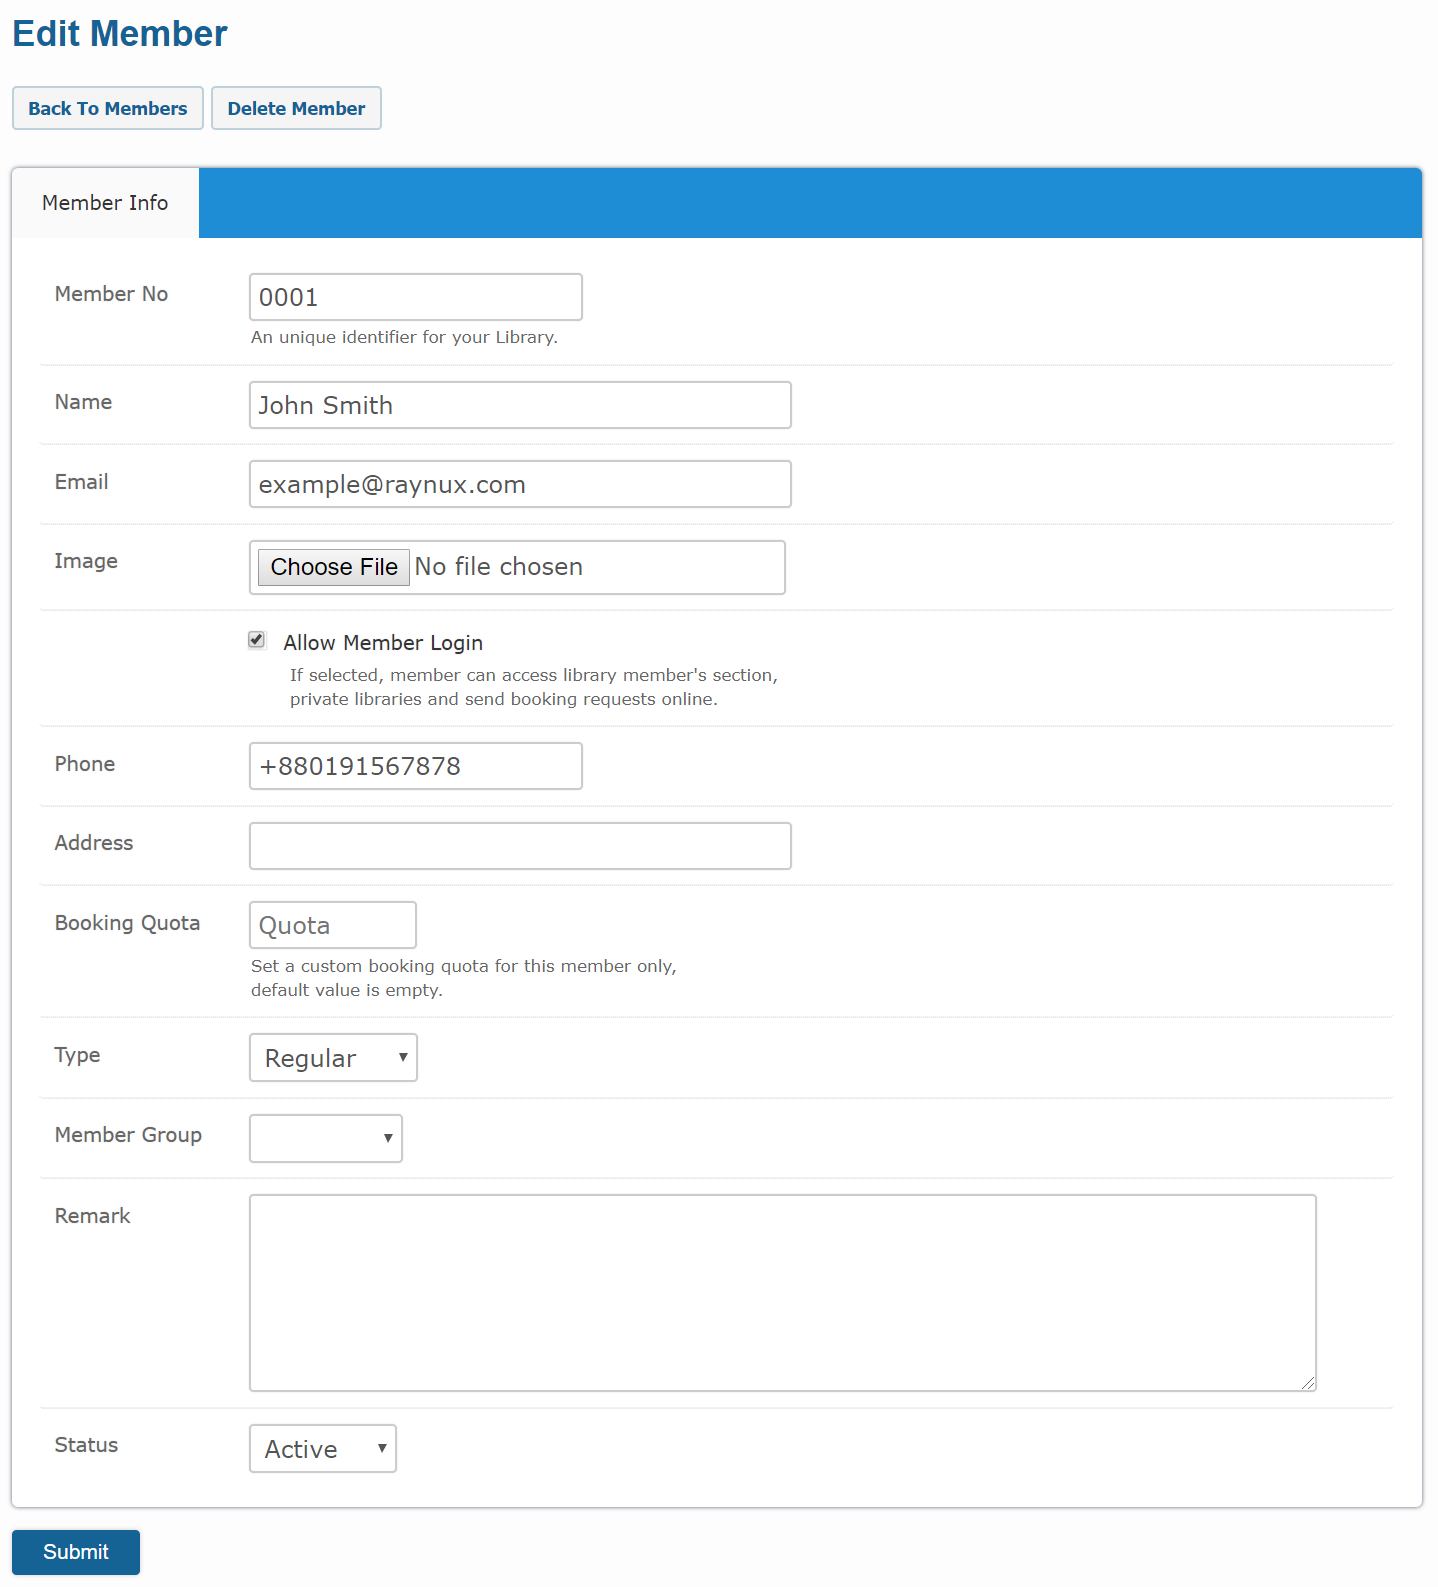
-
Update necessary information regarding the member.
- Click on the
Submitbutton when you are done. - Your changes will be saved.
Import members
You can peform bulk import of members to your library using our bulk import method. Please read our Import Members instruction page for more details on how to proceed.
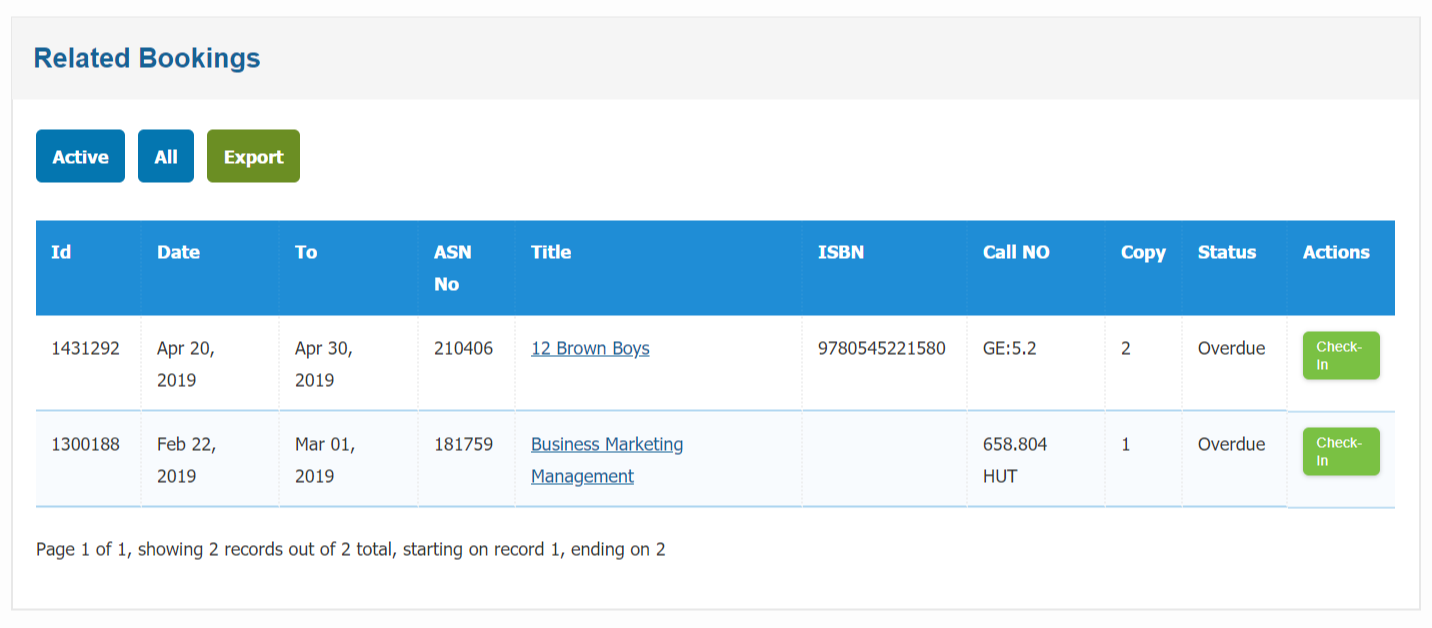
Member related bookings
From members section you can find all the related circulations of your library members. For example all the books a member has borrowed, whether they still have it or have returned it etc. By default you can see only the active bookings of a member but you can see other bookings also. However, you can also export them into a CSV file.
-
To view your member related bookings please go to member view page and navigate to the bottom then you can see all the bookings like below.
Member area access
Librarika has a member only access area for the members (or patrons) of a library. If access is granted, member can login to the library using their credential and access the member area.
In member area they can access following informations:
- View current checked-out items including due date and status.
- View requested items with pending / approval status.
- View past check-out history with status.
- View recently viewed / favorited items.
- Write review to the past check-out items.
Also, they can perform some activities that is otherwise not possible, such as: request item, write review, access catalogs in a private library.
Enable member access
Enabling membr access is very easy. You can do it in following way:
- Go to the members edit page as per above edit member instruction.
- Enter email address of the member if empty.
- Check the
Allow Member Loginoption. - Click on the
Submitbutton when you are done. - A "Join Library" invitation email will be sent to that email address.
- Member needs to accept the invitation in order to connect with your library.
Alternatively, a member can create an account in Librarika platform indenendently and submit Member Access Request to join your library. In this case, go to the Member Requests section as mentioned below and accept or reject the reqeust upon review.
Disable member access
Same way you can disable member login access from the edit member page.
To do so:
- Go to the members edit page as per above edit member instruction.
- Uncheck the
Allow Member Logincheckbox.- Unchecking only this option, will soft-disable the login access. You can enable the access later without requiring any new invitation email.
- To permanently disable the login access, uncheck the
Remove Logincheckbox too.- If unchecked, you can enable login access again with a new invitation email.
- Click on the
Submitbutton when you are done.
Delete member
To delete a member from your library, please follow the below steps:
-
Please go to the
Dashboard -> Circulations -> Memberssection. -
Locate the member record you want to delete and click on the
Editlink on the right to that member. -
Member edit form will be displayed with a button named
Delete Memberon the top of the section. - Click on the
Delete Memberbutton - The member record will be deleted.
Related:
- Deleting a member will set member reference to null for all circulation records, but it will not actually delete the circulation records from the system for future reference.
Member Groups
Member groups section lets you add / edit / delete member group information such as Grade / Class to your library. Once a new member group is created, you can then assign member's to that group from the member edit page.
Member group provides the flexibility to bulk edit / delete the belonging members (or patrons) using the bulk actions method.
To access Member Groups:
- Please go to the
Dashboard -> Circulations -> Memberssection. - Click on the
Member Groupsbutton on top of the section.
Member Requests
Member requests section is where you will see all pending member requests for your library. When someone submit a member access request, it will appear here based on your library policy.
You can then either accept the request or decline the request. If you want to accept, system will ask you to provide a Member No for the new member.
To access Member Requests:
- Please go to the
Dashboard -> Circulations -> Memberssection. - Click on the
Member Requestsbutton on top of the section.
Members Loan / Reservation Receipt
Here you can find the receipt of those items which has been borrowed by your library members. Also you can find the item reservation receipt of your library members.
To do so, please follow the below steps:
- Please go to the
Dashboard -> Circulations -> Memberssection. -
Locate the member record for loan or reservation receipt.
-
Click on the
Viewicon on the right to that member. -
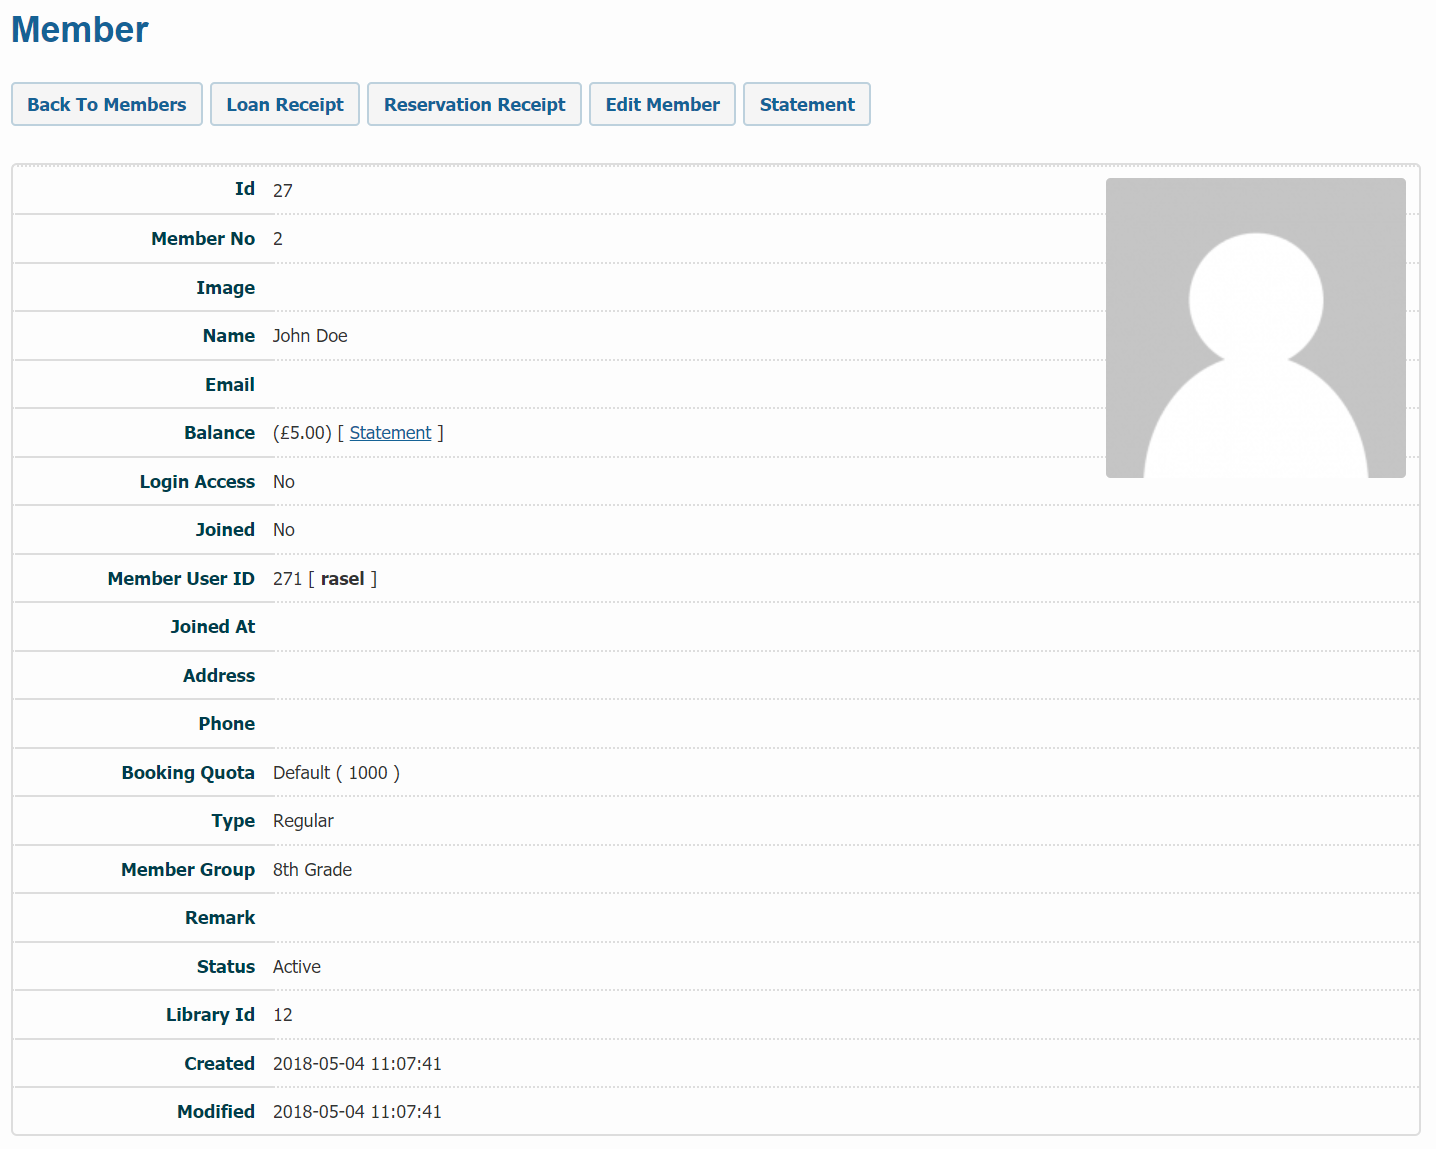
Member details page will be appeared like below.
-
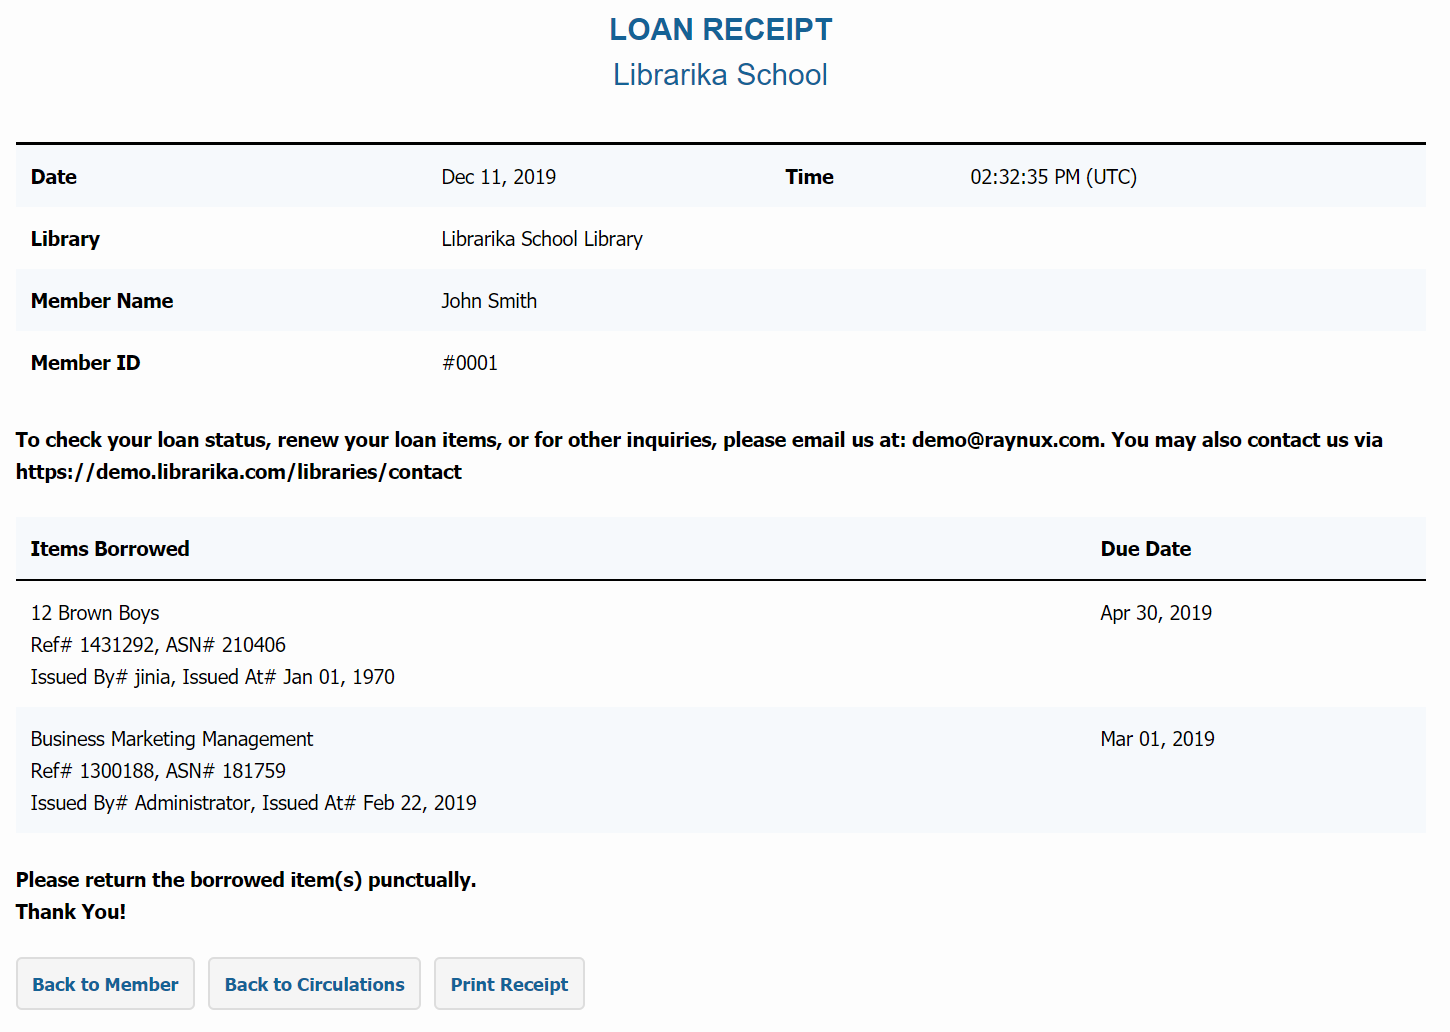
For member loan receipt, please check the followings.
- Click on the
Loan Receiptbutton on top of the member details section. -
The loan receipt form will be appeared as shown below.
-
You can print the receipt if you click on the
Print Receiptbutton.
- Click on the
-
For member reservation receipt, please check the followings.
- Click on the
Reservation Receiptbutton on top of the member details section. -
The reservation receipt form will be appeared as shown below.

-
You can print the receipt if you click on the
Print Receiptbutton.
- Click on the
Members Payment Statement
In this section you can find the account statement of any particular member. Also from this section you can apply various charges and payment to any specific member.
To use this section, please follow the below steps:
- Please go to the
Dashboard -> Circulations -> Memberssection. -
Locate that member whose statement you want to view.
-
Click on the
Viewicon on the right to that member. -
Member details page will be appeared like below.
-
Click on the
Statementbutton from the top of this section.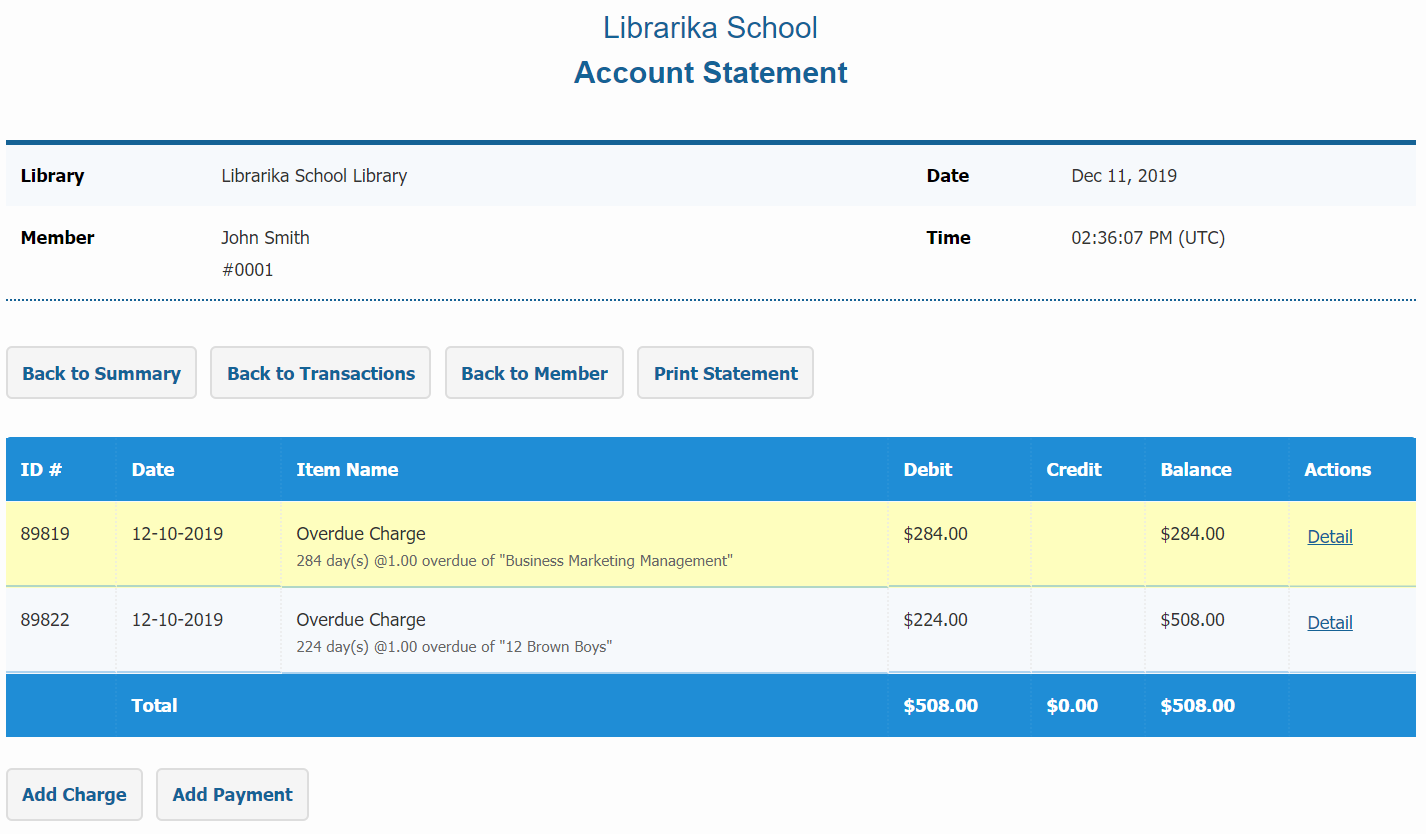
-
Also you can print the statement by clicking on the
Print Statementbutton. - Now at the bottom of this section you can see two buttons.
- If you want to add charge to your library member then you need to enable the fee item (Such as overdue charge) first. To enable fee item please go to the Fees & Payments section and enable the overdue charge fee item.
-
Then click on the
Add Chargebutton from the account statement section and a from will be appeared like below.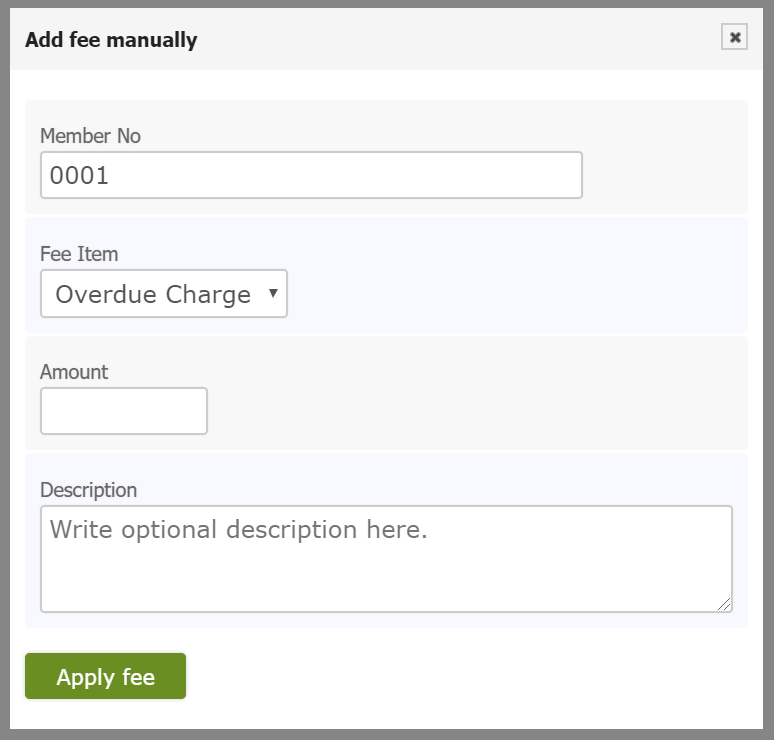
-
In the Amount field you can set the amount that you want to charge to any of your library member.
- If you want to add a payment, you need to enable the fee item (Payment) first. To do so please go to the Fees & Payments section and enable the payment fee item.
-
Then click on the
Add Paymentbutton from the account statement section and a from will be appeared like below.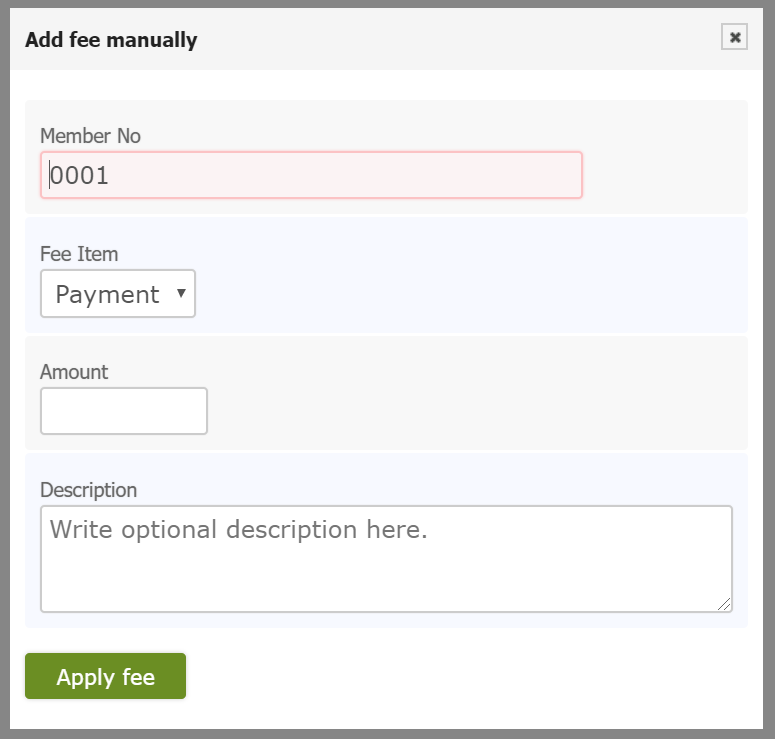
-
In the Amount field please enter the amount that you want to take from a member.
- The amount will be set to 0 if your library member do not have any charge to pay.
- Also amount under Round Brackets means member has extra balance on his / her wallet.